Let's make some Carrots!

Cut a long 'v' shape out of double muslin.
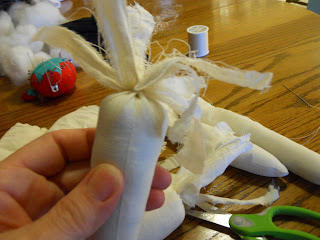
Sew them up and stuff them leaving about a 2" header. Make a running stitch around the top of where you stuffed the carrot....
Sew them up and stuff them leaving about a 2" header. Make a running stitch around the top of where you stuffed the carrot....
Gather, pull it tight, and tie it off.
In half inch (or less) increments, clip the top of the carrot and strip down to the gathering string.
Pull off the 'extra' strings and base coat in an orange acrylic paint of your choice.
Hang 'em out to dry!
For the greens, I used these two together. (Lost my picture of me actually painting). Tape around the top part of your carrot with some wide painters tape or masking tape. I laid the greens down in the paper plate and saturated them well with the paint mixture.I pinned them at the bottom with a large safety pin and then hung them out to dry.
After they were dry, I separated the greens and then washed them down in a Raw Sienna acrylic paint. I could've used a darker color and next time I will.
I added a homemade tag and a bit of jute and...well...I made some carrots!
These will accessorize some sweet bunnies that I'm now painting. Can't wait to show you!
Now you go make some!
}}Hugs{{
Vicky


20 comments:
Those look so simple..always looking for that, thanks for sharing..I am planning on making an Easter tree and those would look great on it.
Have a great day
Smiles and huggs
Maxie
Hey Vicky, Just a thought, but wouldn't it be easier to paint that whole strip green and then cut???? You wouldn't be messing with individual strips????
Lois
O Vicky thanks so much for a great tut Love it ! Cant wait to see your bunnies ! Have a great day painting ! hugs lilraggedyangie
How adorable Vivky! Thanks for the wonderful tutorial.
Thank you for sharing. I have never painted on fabric and will have to give this a try!
Great tut Vicky I love it cute carrots can't wait to see the bunnies
Hugs
Brenda
This is absolutely beautiful, just like your shop. LOVE it!
Hey Vicky!! Great Tut!! Anxiously anticipating the arrival of the bunnies!
Warm Wishes, Kim
YES! Thank you so much for sharing your carrot tutorial! Just what I needed! lol!! Working on Easter goodies and these will be perfect! Thank you!
Karen
Thanks for the tips. They are cute and I can't wait to see what else you have been up to. Blessings ~Sara
These really are the cutest! I would need a few 'supplies' to even get started though! I have fabric! heehee! You are so talented! ♥
You make it look so easy and I have tried many times to make carrots and they never turn out right. Maybe I will follow your directions and try 1 more time. Thanks for sharing :)
Hi, Vicky:
What fun! I just said how I'm putting my "chocolate" rabbits from Brenda in my dough trencher and that I needed to make some fabric carrots to go with them, and here they are! Thanks,
it looks easy enough for me to do.
Hugs,
Susan
Great Tutorial thanks for sharing
:-)
That's so cool. I gotta get me some of that stiffy stuff :o)
Thanks Vicky!
xoxo~Carol
Hi Vicky!
These look good enough to eat. Thanks for sharing! I almost think I could do it minus the sewing machine!
Enjoy your day,
Barb
Thanks Vicky! I would never thought of doing the tops that way and I need to make carrots today! Hugs, Valerie
Thanks for sharing with us Vicky! I will have to try some of these myself!
Donna
Huh?
Yeah....I think I need your remedial class. ;o)
Seriously - these are dang cute....but, holy heck....a lot of work! Smiles & Hugs ~ Robin
You know, I stood and looked at some of these in a shop the other day made from an old bedspread. I am saving this...it looks like a weekend project for me. Thanks for sharing!
Cathy
Post a Comment